Applicable for
all PowerSpec models with the Gigabyte GA-6PMM System Board
Upgrading memory on the Gigabyte GA-6PMM
System Board
CAUTION! Memory is static sensitive. Do not handle loose memory
modules without grounding yourself or using an anti-static strap.
Failure to do so can result in damage to the modules, and result
in premature failure or intermittent problems. Most systems have
power saving features and should have the power cable disconnected
before installing or removing memory, CPUs, or adapter cards.
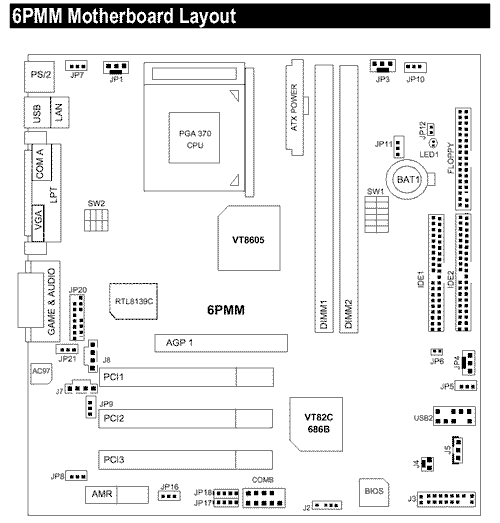
The GA-6PMM system board has two 168-pin DIMM sockets and
will support up to 1GB unbuffered PC133 SDRAM. Memory may be installed
one DIMM module at a time. DIMM module size may vary between banks.
We do not recommend mixing different memory speeds between banks,
use modules of the same speed (PC-100 or PC133) to avoid intermittent
errors or unpredictable operation.
Gigabyte GA6PMM System Board Layout
The GA-6PMM board supports the following memory features:
- 3.3 V (only) 168-pin SDRAM DIMMs
- Unbuffered single-sided or double-sided DIMMs
- 100 or 133 MHz SDRAM DIMMs
- Serial Presence Detect (SPD)
- Minimum total system memory: 16 MB
- Maximum total system memory: 1 GB
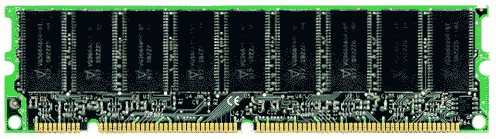
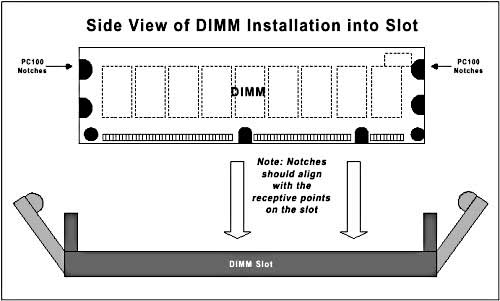
The SDRAM DIMM has two notches along the bottom of the module.
To install the SDRAM DIMM into an available memory slot,
push the plastic tabs away from the available slot. Insert the module
vertically, and press down until it snaps into place. Be sure to
align the notches and raised areas of the slot. The side tabs should
move to the locked position as the module snaps into the socket.
To install memory modules, follow these steps:
- Before installing or removing memory, make sure that
AC power is disconnected by unplugging the power cord from the
computer. Failure to do so could damage the memory and the system
board.
- Insert each DIMM module vertically into its slot. Pay attention
to the two notches along the bottom of the module to prevent inserting
the DIMM incorrectly.
- Gently press down on the DIMM module until it snaps into place.
If installing only a single DIMM, you may use either Bank.
The GA-6PMM will support a maximum of 1 GB of unbuffered
SDRAM in its two DIMM slots. Some typical configurations are listed
below. All modules must be PC133 or PC-100 SDRAM DIMMs:
|
DIMM1
|
DIMM2
|
Total Memory
|
|
32MB DIMM
|
Empty
|
32MB
|
|
32MB DIMM
|
32MB DIMM
|
64MB
|
|
64MB DIMM
|
Empty
|
64MB
|
|
64MB DIMM
|
32MB DIMM
|
96MB
|
|
64MB DIMM
|
64MB DIMM
|
128MB
|
|
128MB DIMM
|
Empty
|
128MB
|
|
128MB DIMM
|
32MB DIMM
|
160MB
|
|
128MB DIMM
|
64MB DIMM
|
192MB
|
|
128MB DIMM
|
128MB DIMM
|
256MB
|
|
256MB DIMM
|
Empty
|
256MB
|
|
256MB DIMM
|
64MB DIMM
|
262MB
|
|
256MB DIMM
|
128MB DIMM
|
384MB
|
|
256MB DIMM
|
256MB DIMM
|
512MB
|
|
512MB DIMM
|
Empty
|
512MB
|
|
512MB DIMM
|
512MB DIMM
|
1024MB
|
|